


1. 前言
前一节我们讲述了如何通过读源码,查询 StackOverFlow,写 DEMO 方式学习线程池。
然而线程池在使用过程中会遇到很多问题,本节将通过几个案例研究 Java 虚拟机关闭的问题。
2. 背景知识
本节重点学习 JVM 关闭时机相关问题,那么 JVM 在何时正常退出呢(不包含通过 kill 指令杀死进程等情况)?
根据《 Java 虚拟机规范 (Java SE 8 版)》 第 228 页,对应英文版为 5.7 Java Virtual Machine Exit 的相关描述我们可知:
Java 虚拟机退出的条件是,某个线程调用了
Runtime类或System类的exit方法,或Runtime类的halt方法,并且 Java 安全管理器也允许这次exit或halt操作。除此之外, JNI (Java Native Interface) 规范描述了用 JNI Invocation API 来加载或卸载 Java 虚拟机时,Java 虚拟机的退出情况 1。
根据《Java 并发编程实践》 164 页相关论述 ,我们还了解到:
也可以通过一些其他平台相关的手段(比如发送 SIGINT, 或键入 Ctrl-C), 都可以实现 JVM 的正常关闭。还可以调用 “杀死” JVM 的操作系统进程而强制关闭 JVM 2。
另外根据《Java Language Specification : Java SE 8 Edition》12.8 Program Exit 的相关描述 3 我们可知:
当下面两种情况发生时,程序将会结束所有活动并退出:
- 只剩下守护线程( daemon thread)时。
- 某个线程调用了
Runtime类或System 类的exit方法,并且 Java 安全管理器也允许这次exit操作。
了解这个背景知识,接下来我们将开始分析相关的案例。
3. 案例及其分析
3.1 JUnit 单元测试不支持多线程问题
本案例涉及两个类,一个是自定义线程类,一个是测试类。
自定义线程类:
import java.util.concurrent.TimeUnit;

public class DemoThread extends Thread {


    public DemoThread() {
    }

    @Override
    public void run() {
        for (int i = 0; i < 4; i++) {
            System.out.println(Thread.currentThread().getName() + "-->" + i);
            try {
                TimeUnit.SECONDS.sleep(1);
            } catch (InterruptedException ignore) {
            }
        }
    }

}
对应的单元测试:
public class ThreadDemoTest {
    @Test
    public void test() throws InterruptedException {
        DemoThread demoThread1 = new DemoThread();
        DemoThread demoThread2 = new DemoThread();

        demoThread1.start();
        demoThread2.start();
    }
}
预期结果为,每个线程分别执行 4 次打印语句。
但是实际运行结果为:
Thread-0–>0
Thread-1–>0
打印两行文字后程序退出。
通过观察现象,我们看出 JUnit 单元测试 “不支持多线程” 测试,换句话说两个线程可能还没没执行完,程序就退出了。
我们首先尝试使用 ** 断点调试大法 ** 来寻找线索。
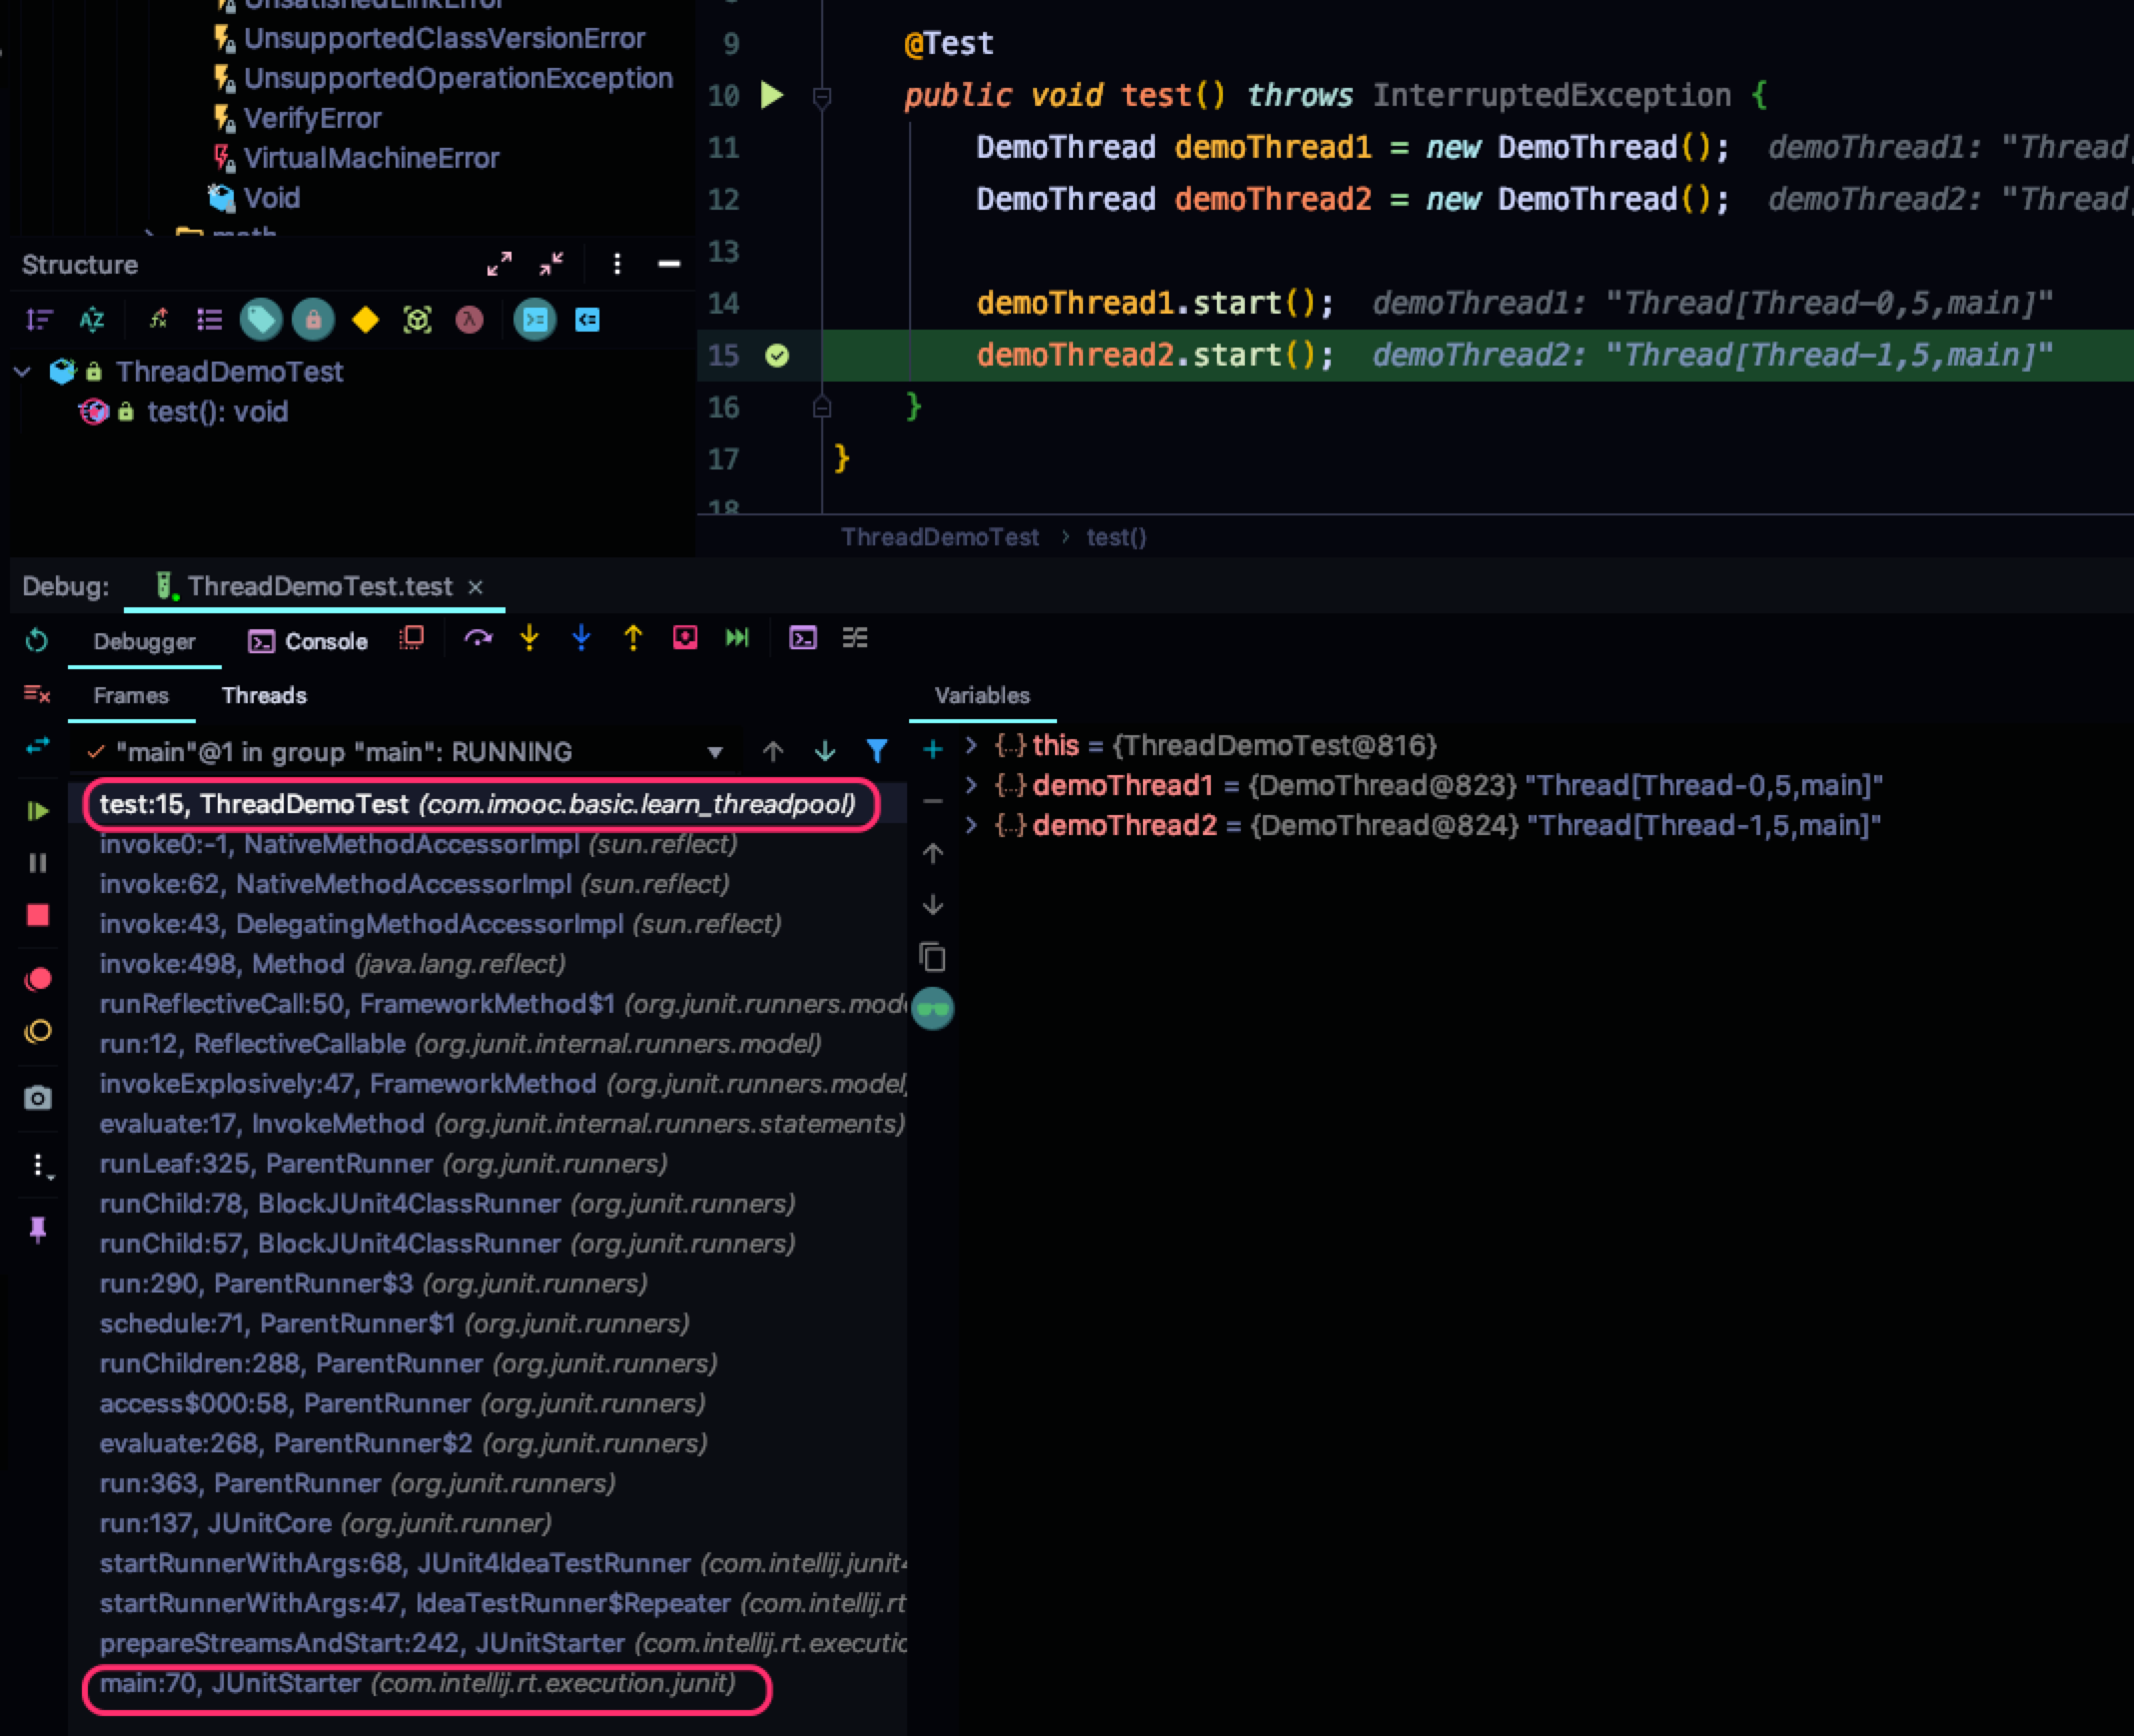
我们通过查看左侧的调用栈,可以清晰地看到顶层的为 com.intellij.rt.execution.junit.JUnitStarter#main 的 70 行,通过一系列的调用,启动当前测试方法。
按照惯例,我们可以双击左侧的调用进入源码。
但是,令人吐血的是,双击没反应,崩溃中…
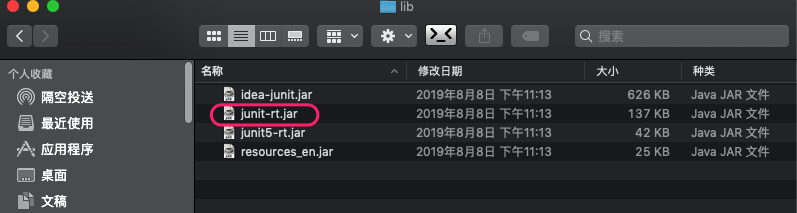
既然 IDEA 可以使用该类,那么显然此类可以被 IDEA 加载,根据最外层的入口包名(com.intellij.rt.execution.junit),我们断定不是 JDK 中的类,也不是我们 pom.xml 中引入的 jar 包中的类,应该是 idea 自己的类库。
我们去 IDEA 的安装目录去寻找线索。排查了 lib 文件夹下的所有 jar 包,发现和名称相匹配的 jar 包。
我们如何查看这几个 jar 中有没有源码和上面的匹配呢?
可以使用前面介绍的 Java 反编译工具: JD-GUI,查看这些包的源码。
由于我们使用的是 JUnit4 我们首先查看 junit-rt.jar 的反编译代码。
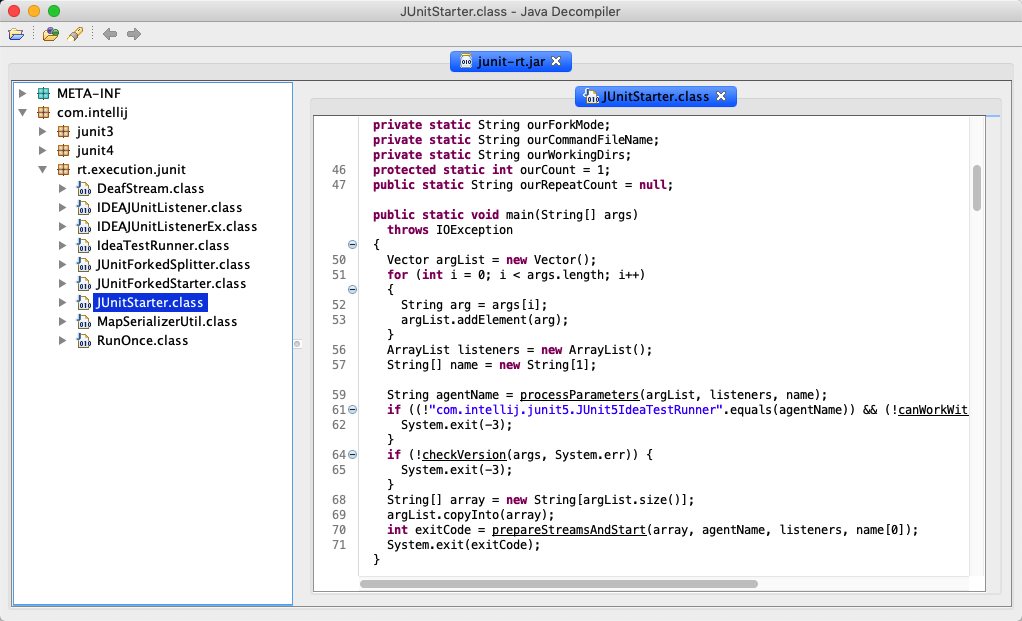
我们在此处找到了 IDEA 调试时顶层的类!
从此反编译的代码可以看到, main 函数的 70 行。
int exitCode = prepareStreamsAndStart(array, agentName, listeners, name[0]);
该函数调用准备流和开始函数,并获得返回值作为退出码,然后调用 System.exit(exitCode); 退出 JVM。
因此问题就迎刃而解了。
我们重新梳理执行流程:
IDEA 运行 JUnit 4 时,
- 先执行
com.intellij.rt.execution.junit.JUnitStarter#main,此函数中调用prepareStreamsAndStart子函数; - 子函数最终调用到
ThreadDemoTest#test的代码。 ThreadDemoTest#test创建两个新线程并依次开启后结束,函数返回退出码,最终调用System.exit(exitCode);退出 JVM。
那么如何避免两个子线程尚未执行完单元测试函数,就被主线程调用 System.exit 导致 JVM 退出呢?
方案 1:可以将代码写在 main 函数中;
还记得开头说的吗,只要有一个非守护线程还在运行,虚拟机就不会退出(正常情况下)。
使用 main 函数代码非常简单,这里就不再提供。
方案 2:可以使用 CountDownLatch;
改造自定义的线程类:
import java.util.concurrent.CountDownLatch;
import java.util.concurrent.TimeUnit;

public class DemoThread extends Thread {

    private CountDownLatch countDownLatch;

    public DemoThread(CountDownLatch countDownLatch) {
        this.countDownLatch = countDownLatch;
    }

    @Override
    public void run() {
        for (int i = 0; i < 4; i++) {
            System.out.println(Thread.currentThread().getName() + "-->" + i);
            try {
                TimeUnit.SECONDS.sleep(10);
            } catch (InterruptedException ignore) {
            }
        }
        countDownLatch.countDown();
    }

}
修改单元测试函数:
@Test
public void test() throws InterruptedException {
    CountDownLatch countDownLatch = new CountDownLatch(2);
    DemoThread demoThread1 = new DemoThread(countDownLatch);
    DemoThread demoThread2 = new DemoThread(countDownLatch);

    demoThread1.start();
    demoThread2.start();

    countDownLatch.await();
}
由于使用了 countDownLatch.await(); 主线程会阻塞到两个线程都执行完毕。
具体原理大家可以查看 java.util.concurrent.CountDownLatch#await() 源码。
方案 3:可以在测试函数最后调用 join 函数:
@Test
public void test() throws InterruptedException {
    DemoThread demoThread1 = new DemoThread();
    DemoThread demoThread2 = new DemoThread();

    demoThread1.start();
    demoThread2.start();

    demoThread1.join();
    demoThread2.join();
}
join 函数会等待当前线程执行结束再继续执行。
3.2 使用 CompletableFuture 的问题
大家可以猜想一下下面代码的执行结果是啥?
public class CompletableFutureDemo {

    public static void main(String[] args) {
        CompletableFuture.runAsync(() -> {
            try {
                TimeUnit.SECONDS.sleep(2L);
            } catch (InterruptedException ignore) {
            }
            System.out.println("异步任务");
        });
    }
}
可能出乎很多人的意料,如果运行此段代码,大概率会发现:打印语句并没有被执行程序就退出了。
What? ** 前面不是说多线程问题可以通过将代码写在 main 函数中来避免的吗?** 怎么瞬间打脸?
别急,我们来研究一下这个问题:
/**
 * Returns a new CompletableFuture that is asynchronously completed
 * by a task running in the given executor after it runs the given
 * action.
 *
 * @param runnable the action to run before completing the
 * returned CompletableFuture
 * @param executor the executor to use for asynchronous execution
 * @return the new CompletableFuture
 */
public static CompletableFuture<Void> runAsync(Runnable runnable,
                                               Executor executor) {
    return asyncRunStage(screenExecutor(executor), runnable);
}
通过源码注释,我们可知该函数是使用给定的 executor 来异步执行任务。
那么使用的线程池类型是什么呢?
/**
 * Null-checks user executor argument, and translates uses of
 * commonPool to asyncPool in case parallelism disabled.
 */
static Executor screenExecutor(Executor e) {
    if (!useCommonPool && e == ForkJoinPool.commonPool())
        return asyncPool;
    if (e == null) throw new NullPointerException();
    return e;
}
我们查看 asyncPool 的具体类型:
/**
   * Default executor -- ForkJoinPool.commonPool() unless it cannot
   * support parallelism.
   */
  private static final Executor asyncPool = useCommonPool ?
      ForkJoinPool.commonPool() : new ThreadPerTaskExecutor();

  /** Fallback if ForkJoinPool.commonPool() cannot support parallelism */
  static final class ThreadPerTaskExecutor implements Executor {
     public void execute(Runnable r) { new Thread(r).start(); }
   }
默认是 ForkJoinPool.commonPool() ,如果不支持并行则会构造一个新的 ThreadPerTaskExecutor 线程池对象。
我们再次回到正题,我们可以查看调用链:
java.util.concurrent.CompletableFuture#runAsync(java.lang.Runnable)
java.util.concurrent.CompletableFuture#asyncRunStage
java.util.concurrent.ForkJoinPool#execute(java.lang.Runnable)
java.util.concurrent.ForkJoinPool#externalPush
…
最终调用到:
java.util.concurrent.ForkJoinPool#registerWorker
如下图所示,大家可以在 registerWorker 函数的设置守护线程代码的地方打断点,然后调试,通过查看左侧 “Debugger” 选项卡的 “Frames” 调用栈来研究整个调用过程,也可以切换到 “Threads” 来查看线程的运行状态。
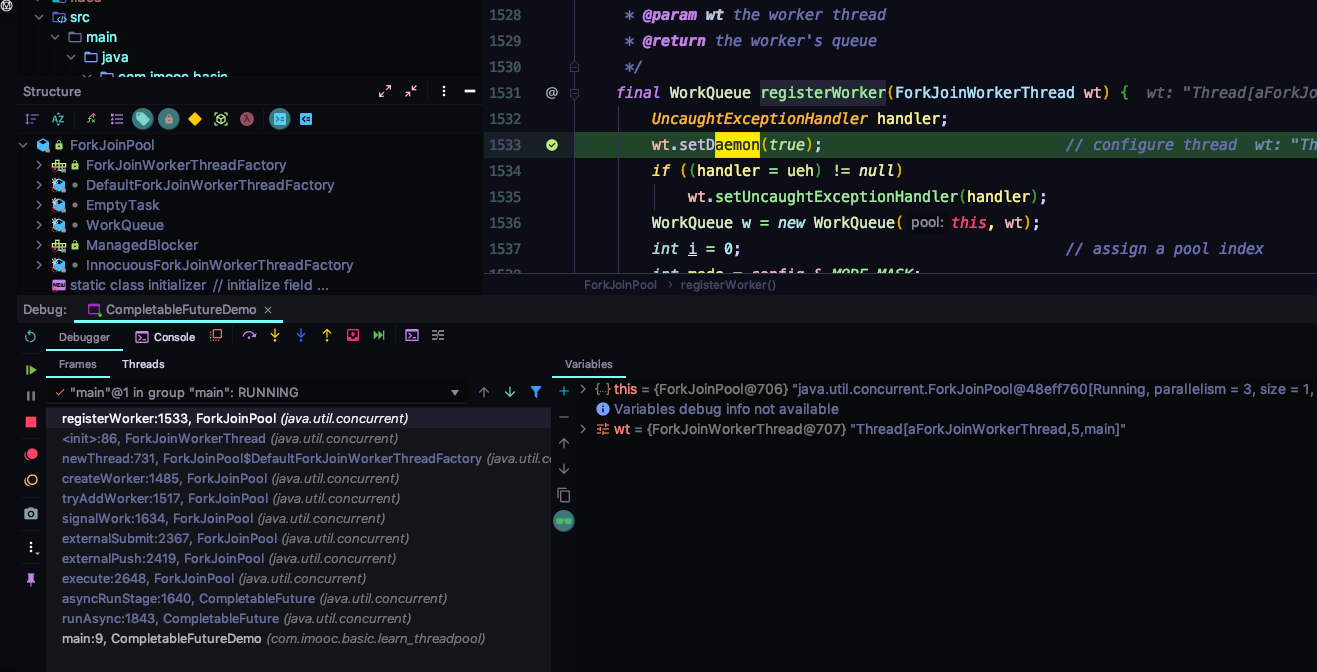
接下来我们看源码:
/**
 * Callback from ForkJoinWorkerThread constructor to establish and
 * record its WorkQueue.
 *
 * @param wt the worker thread
 * @return the worker's queue
 */
final WorkQueue registerWorker(ForkJoinWorkerThread wt) {
    UncaughtExceptionHandler handler;
    // 第 1 处
    wt.setDaemon(true);                           // configure thread
    // 省略中间代码
    wt.setName(workerNamePrefix.concat(Integer.toString(i >>> 1)));
    return w;
}
从这里可知 ForkJoinPool 的工作线程类型为守护者线程。
根据前面背景知识的介绍,我们可知如果只有守护线程,程序将退出。
另外,我们也可以从设置守护线程的函数中找到相关描述:
/**
 * Marks this thread as either a {@linkplain #isDaemon daemon} thread
 * or a user thread. The Java Virtual Machine exits when the only
 * threads running are all daemon threads.
 *
 * <p> This method must be invoked before the thread is started.
 *
 * @param  on
 *         if {@code true}, marks this thread as a daemon thread
 *
 * @throws  IllegalThreadStateException
 *          if this thread is {@linkplain #isAlive alive}
 *
 * @throws  SecurityException
 *          if {@link #checkAccess} determines that the current
 *          thread cannot modify this thread
 */
public final void setDaemon(boolean on) {
    checkAccess();
    if (isAlive()) {
        throw new IllegalThreadStateException();
    }
    daemon = on;
}
因此我们重新分析上面的案例:
public static void main(String[] args) {
  // 第 1 处
    CompletableFuture.runAsync(() -> {
        try {
            TimeUnit.SECONDS.sleep(2L);
        } catch (InterruptedException ignore) {
        }
        System.out.println("异步任务");
    });
  // 第 2 处
}
主线程为普通用户线程,执行到第 1 处,使用默认的 ForkJoinPool 来异步执行传入的任务。
此时工作线程(守护线程)如果得到运行机会,调用 TimeUnit.SECONDS.sleep(2L); 导致该线程 sleep 2 秒钟。
主线程执行到第 2 处 (无代码),然后主线程执行完毕。
此时已经没有非守护线程,还不等工作线程从 Time waiting 睡眠状态结束,虚拟机发现已经没有非守护线程,便退出了。
3.3 拓展练习
有了上面的介绍,想必大家对虚拟机的退出时机有了一个不错的了解,那么我们看下面的代码片段:
请问程序执行后是否一定执行到 finally 代码块,为什么?
public class Demo {

    public static void main(String[] args) {
       // 省略一些代码 (第 1 处)
        try {
            BufferedReader br = new BufferedReader(new FileReader("file.txt"));
            System.out.println(br.readLine());
            br.close();
        } catch (Exception e) {
            // 省略一些代码 (第 2 处)
        } finally {
            System.out.println("Exiting the program");
        }
    }
}
结合今天所学内容,很多朋友可能会想到,在第 2 处如果让当前虚拟机退出,那么 finally 代码块就不会再执行。
因此可以添加 System.exit(2) 来实现。
当然还有其他的方法能够实现,大家可以在评论区畅所欲言。
4. 总结
本节重点讲述了虚拟机退出的条件,举了几个案例让大家能够对此有深刻的理解。
本节使用了读源码法,官方文档法,断点调试法等来分析这两个案例。
下一节我们将讲述如何解决多条件语句和条件语句的多层嵌套问题。
5. 思考题
请看下面代码片段,回答问题。
public class Demo {

    public static void main(String[] args) {

      // 省略一些代码 (第 1 处)
        try {
            BufferedReader br = new BufferedReader(new FileReader("file.txt"));
            System.out.println(br.readLine());
            br.close();
        } catch (Exception e) {
           System.exit(2);
        } finally {
            System.out.println("Exiting the program");
        }
    }
}
问题:如果 try 代码块发生异常,如何在第 1 处代码添加几行代码,使得 finally 代码块可以被执行到呢?
参考资料
[美] Tim Lindholm, Frank Yellin, Gilad Bracha, Alex Buckley.《 Java 虚拟机规范 (Java SE 8 版)》. [译] 爱飞翔,周志明等。机械工业出版社:2018:228 ↩︎
[美] Brian Goetz, Tim Peierls,etc.《Java 并发编程实践》. 韩锴,方妙译。北京。电子工业出版社. 2007.164 ↩︎
Tim Lindholm, Frank Yellin, Gilad Bracha, Alex Buckley.《Java Language Specification: Java SE 8 Edition》. 2015.378 ↩︎
